
Triangle Pose
Where is the primary focus? Entire body
Where does the posture provide maximum benefits? Legs, spines, arms, core.
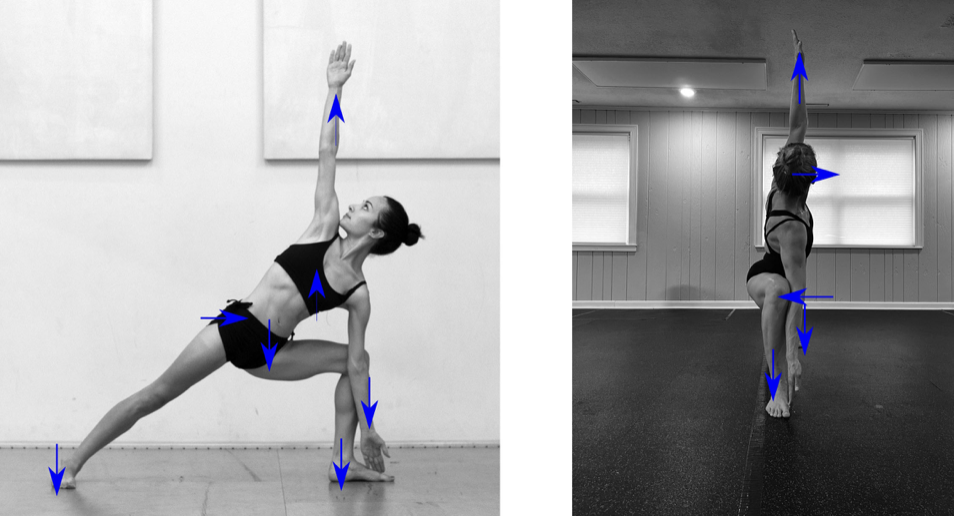
When and where could I feel the stretch?
Inner thighs, if you are sitting down low enough.
Straight leg, if your knee is locked and you are pressing your foot down.
Bent knee leg, if you are pressing down through your heel.
Straight leg hip, if you are pushing your hip forward.
Through your core, if you are lengthening and twisting.
Your arms, if you are stretching them apart.
Your neck, if you are turning it.
Why should I do this posture?
It uses a large group of muscles and takes a huge amount of discipline to keep your breathing calm.
How can I improve?
Triangle is positioned after several other hard postures; like so much in class, it’s designed to be challenging. Instead of sitting triangle out when you are tired, what about doing just part of it? Instead of doing a sloppy triangle, what about doing each step until you lose good alignment? This step-by-step way of doing postures works for every posture in the sequence. When you take it step by step, it also lets you see what is happening with your body in the present moment, instead of relying on how you felt last class or even the moment before. When you feel pain or lose the integrity of the posture, back off a bit or get out. There is never a reason to struggle. Instead, it’s better to find the balance of effort and ease.
Making each part of the posture its own discrete movement is important. In the setup, it starts with being deliberate with your arms, stretching them out as widely as you can to stretch your arms.
When you step, bring your arms down with intention instead of just letting them flop down; this builds muscle and concentration. Pulling your arms back opens your chest and keeps your arms active. It’s hard not to go on autopilot in the setup, but listening and moving with instructions keeps you connected and hopefully hearing new points of teaching.
After turning your right toes out and bending your knee, things get more interesting. The hardest thing for me lately has been keeping my spine not only in the middle but my stomach in, chest up, and arms back. It has been hard work, and yet I find that when I turn, it keeps my spine longer and straighter, so it’s worth it!
The other part of the setup that some students struggle with is pushing their hip forward and down on the straight leg. When the hip of the straight leg moves down and forward, it lets your bent knee face directly to the side of the room. This fine-tuning of your hips is followed by pushing both of your hips forward and sitting down deep enough. Before we even get to the final position, you are doing a ton of work.
When I’m at this point in the setup, I want the next part of the posture to happen already because it’s hard. The temptation is to move at your own pace instead of waiting for instructions, yet waiting once again keeps you connected with the instructions and connected to the other students, and challenged.
When the time finally comes to turn your arms, it’s so tempting to sort of crash down until your arms are relatively in the right place, instead of stretching down and up at the same time, creating a tension where you can stop anywhere you want (in theory). It's moving with your muscles engaged instead of using your muscles to just stop you at the end of the movement. Lining up your elbow with your knee is hard. I tend to go too low so I can touch my toes, and I know I shouldn’t rest any weight in my fingers against my foot, but I do… I‘m working on lining up my knee and elbow exactly. It's easy for me to come up with rationalizations for being too high or low, but it’s way more rewarding to do it the right way.
Once your elbow is as close to your knee as you can get it, turn your chin towards your shoulder; think ear towards the mirror to stop from letting your head drop back.
Next, use your elbow to push your knee back until it points directly to the side wall, at the same time push your hip on the straight leg side forward and down. This takes care of your lower body, then bring your lower shoulder forward and upper shoulder back; this twists your spine slightly. The hard work here is putting length in your spine. To do that, press your foot on your straight leg into the ground, fully engage that leg, suck your stomach in, and stretch from the foot you are pressing into the floor through the top of your head towards the side wall. It’s the length and the twist together that takes so much effort.
Once you are in position, the work is to use your breath to keep you calm both mentally and physically. Slow it all down, your breath and your thoughts.
Exiting is so challenging because the temptation is to just get back to standing any way that you can, but to build strength, move step by step, putting a pause in between each movement.
First, you move your torso and arms. Then straighten your bent knee, then turn your foot forward again. Here, it’s easy to just turn your other foot out and start the next side, but take a moment to reset here. Hips forward, arms back, core engaged, then the next side starts.
Every posture and every movement can be broken down into small movements. The more we get interested in those movements, the precision, the thoughts and feelings we have, the better we can make class for ourselves. As much as the heat, the teacher, and the other people in the room influence how we experience class, what we are really working for with yoga is a better understanding of who we are, why we experience what we experience, and how to get back to homeostasis in a more effective way.